Get started
Now we describe how to get started with openSMILE. First, we will explain how to obtain and install openSMILE. If you already have a working installation of openSMILE you can skip directly to Section Extracting your first features, where we explain how to use openSMILE for your first feature extraction task.
To make your life a bit simpler and to provide common feature sets to the research community for various tasks, a number of sample configuration files are provided. These are explained in Section Default feature sets. Included are all the baseline feature sets for the INTERSPEECH 2009–2013 affect and paralinguistics challenges.
In Section Using PortAudio for live recording/playback, we will teach you how to use the PortAudio interface components to set up a simple audio recorder and player, as well as a full live feature extraction system.
Section Extracting features with OpenCV will help you getting started with video feature extraction and synchronised audio-visual feature extraction.
Finally, Section Visualising data with Gnuplot outlines how you can plot extracted features using the open-source tool gnuplot.
Obtaining and Installing openSMILE
The latest (and also previous) releases of openSMILE can be found at https://github.com/audeering/opensmile/releases. Releases include Intel x64 binaries for Windows, Linux and MacOS. You can also build and modify openSMILE yourself if desired. Starting with version 3.0, the source code is hosted on GitHub. Sources of older releases are included in the release archives. Building from source code is the recommended way for Linux/Unix and MacOS systems, and is mandatory if you require external dependencies such as PortAudio or FFmpeg, or your platform is x86, ARM or Android/iOS.
Release packages contain the main executable SMILExtract for Linux and
a corresponding SMILExtract.exe for Windows in the bin/ folder.
Sample configuration files are contained in the config/ folder and scripts
for visualisation and other tasks such as model building are included in the
scripts/ folder.
To test if your release works, change into the bin/ folder and type
SMILExtract -h
in the shell/command prompt. If you see the usage information, everything is working.
Note
The binaries contained in releases are statically linked, i.e. the shared API libopensmile is linked into the binary. The binaries only depend on libc6 and pthreads. The downside of this method is that you cannot use openSMILE plugins with these binaries. In order to use plugins, you must compile the source code yourself to obtain a binary linked dynamically to libopensmile (see Section Compiling on Linux/Mac). As no binary release with PortAudio support is provided for Linux, you must compile from the source code in order to use PortAudio recording/playback (see Section Compiling on Linux/Mac with PortAudio and OpenCV support).
Note
No binaries are provided for openSMILE with OpenCV support. In order to use video features, you must compile from source on a machine with OpenCV installed. Compilation on both Windows and Linux is supported. See Sections Compiling openSMILE on Linux/Mac with OpenCV video support and Compiling on Windows with PortAudio and OpenCV support.
Compiling from source
The core of openSMILE compiles without any third-party dependencies, except for pthreads on Unix systems. The core version is a command-line feature extractor only. You cannot perform live audio recording/playback with this version. If you require additional functionality, you can build openSMILE with the following external dependencies:
PortAudio: live audio recording/playback on Linux, Windows and MacOS
FFmpeg: reading from audio files other than uncompressed WAVE
OpenCV: feature extraction from images
OpenSL ES: live audio recording on Android
CoreAudio: live audio recording/playback on iOS
Compiling on Linux/Mac
This section describes how to compile and install openSMILE on Unix-like
systems step-by-step. You need to have the following packages installed:
git, make, GNU C and C++ compiler gcc and g++, and
cmake.
Make sure that you use recent versions of all packages. gcc versions
below 4.8 are known to be incompatible with openSMILE. Instead of gcc, you
may also use a version of Clang that supports C++11. CMake 3.5.1 or
higher is required. To run the scripts for visualisation, you may want to
install perl5 and gnuplot. Please refer
to your distribution’s documentation on how to install packages. You
will also need root privileges to install new packages. We recommend
that you use the latest Ubuntu or Debian Linux where packages can be
easily installed using the command
sudo apt-get install package-name.
Start by cloning the source code from GitHub:
git clone https://github.com/audeering/opensmile.git
Alternatively, you may download and unpack the source as ZIP file from https://github.com/audeering/opensmile/archive/master.zip.
Then change to the newly created directory:
cd opensmile/
In build_flags.sh, you can customize which components get included
in the build (for example, in order to build with PortAudio support).
You can also switch between debug and release builds, or specify Clang
as an alternative compiler.
You can start the build process by executing
bash build.sh
or, if the above doesn’t work
sh build.sh
This will configure and build the libopensmile library and the
SMILExtract binary. After successful compilation, you may want to
add the build/progsrc/smilextract directory to your path or copy the
binary build/progsrc/smilextract/SMILExtract to a directory in your
search path. Finally, start by running
SMILExtract -h
to show help on the usage of the SMILExtract tool.
Compiling on Linux/Mac with PortAudio and OpenCV support
This section describes how to install PortAudio and OpenCV, and compile openSMILE with these dependencies.
Installing PortAudio
PortAudio version 19 is required. If you’re running Ubuntu/Debian, we recommend installing it through the official repositories:
sudo apt-get install portaudio19-dev
If you are using a different distribution, you might have to compile PortAudio yourself. In this case, please follow the official instructions on http://www.portaudio.com.
Installing OpenCV
You need OpenCV version 2.2 or higher as prerequisite. Recent versions of Ubuntu provide OpenCV through the standard repositories. To install, just execute
sudo apt-get install libopencv*
in a shell. This will also take care of the dependencies.
If you are, however, using a different distribution, you might have to compile OpenCV yourself. In this case, make sure to compile OpenCV with FFmpeg support, as otherwise openSMILE will not be able to open and decode video files.
Don’t forget to execute sudo make install at the end of the
installation to install OpenCV. After the installation you might need to
update your library paths in /etc/ld.so.conf and add the line
/usr/local/lib, if it is not already there.
Compiling openSMILE on Linux/Mac with OpenCV video support
After you have successfully installed OpenCV, openSMILE can be compiled
with support for video input through OpenCV. In build_flags.sh, set
WITH_OPENCV to ON and run build.sh.
After the build process is complete, you can verify with “./SMILExtract -L” that cOpenCVSource appears in the component list. If you get an error message that some of the libopencv*.so libraries are not found when you run SMILExtract, type this command in the shell before you run SMILExtract:
export LD_LIBRARY_PATH=/usr/local/lib
Compiling on Windows
For compiling openSMILE on Microsoft Windows (7 and higher are
supported), we recommend using Visual Studio. Make sure you have Visual
Studio 2019 installed. You will also need CMake version 3.15 or later
and make sure it is available in your PATH environment variable.
From the start menu, open Visual Studio 2019 \(\rightarrow\) x64 Native Tools Command Prompt for VS 2019 and change into the openSMILE source folder:
cd opensmile
In build_flags.ps1, you can customize which components get included
in the build (for example, in order to build with PortAudio support).
You can also switch between debug and release builds.
You can start the build process by executing
powershell -ExecutionPolicy Bypass -File build.ps1
This will configure and build the SMILExtract.exe binary.
After successful compilation, you may want to
add the build/progsrc/smilextract directory to your path or copy the
binary build/progsrc/smilextract/SMILExtract.exe to a directory in your
search path. Finally, start by running
SMILExtract -h
to show help on the usage of the SMILExtract tool.
Compiling on Windows with PortAudio and OpenCV support
If you want to compile openSMILE with any external dependencies such as PortAudio or OpenCV, we recommend to use vcpkg 3 to install the needed libraries. First, obtain the latest version of vcpkg by checking out the GitHub repository:
git clone https://github.com/Microsoft/vcpkg.git
cd vcpkg
or, download the repository as a ZIP file and unpack it. Then, run
.\\bootstrap-vcpkg.bat
to build vcpkg. Run the following command with admin rights to integrate vcpkg into Visual Studio:
.\\vcpkg integrate install
Install any required dependencies via vcpkg by running
.\\vcpkg install *package*:*triplet*
where package is “portaudio” or “opencv[ffmpeg]”, and triplet is one
of “x86-windows”, “x86-windows-static”, “x64-windows” and
“x64-windows-static”. Which triplet to choose depends on the target
platform you want to compile for and whether you want to link
statically or dynamically to the dependencies. Finally, in
build_flags.ps1, uncomment the line defining the
CMAKE_TOOLCHAIN_FILE variable and adjust its value to point to the
vcpkg.cmake file in your vcpkg installation directory.
Now, follow the usual steps for building on Windows.
Note
As of 23 July 2018, the current version of the vcpkg package for OpenCV has a bug 4 that leads to FFmpeg components not being included in debug builds. Attempting to analyse video using cOpenCVSource will fail in this case. As a workaround, compile openSMILE as a release build.
Creating customised builds
Through its modular architecture, it is possible to create customised
builds of openSMILE by including or excluding many components and
dependencies in order to obtain as small and efficient binaries as
possible. When compiling for Linux or Mac, you can view and modify the
available build options in the build_flags.sh file. On Windows,
use the build_flags.ps1 file instead.
Release/debug builds
If you intend to run openSMILE in a debugger or want to see debug (DBG)
messages in the openSMILE log, you should build openSMILE using the
debug configuration. To do this, set the CMAKE_BUILD_TYPE option to
Debug. The generated binary will then include extensive debugging
information and the command-line option -d of SMILExtract is
enabled.
Static/dynamic linking
By default, SMILExtract will be linked statically to libopensmile. This
has the advantage that you only need to ship and install a single
portable file (you may still need to install any external dependencies,
though). Note, however, that openSMILE plugins will not work with
statically linked binaries. If you require plugin support, you need to
create dynamically linked binaries by setting the STATIC_LINK option
to OFF.
Note
On Linux/Mac, if you move the SMILExtract and
libopensmile.so binaries from their build directory to another
location, you may have to update your library path to include the
path to the directory containing libopensmile.so:
export LD_LIBRARY_PATH=/path/to/destination/dir
You need to do this every time you reboot, log-on or start a new
shell. To avoid this, check your distribution’s documentation on how
to add environment variables to your shell’s configuration files.
For the bash shell, usually a file called .profile or
.bashrc exists in your home directory to which you can add the
two export commands listed above.
On Windows, it is usually sufficient to keep the
opensmile.dll library in the same folder as SMILExtract.exe.
Compiling for Android and creating the sample Android app
This chapter explains how to compile openSMILE for Android.
Change into the directory progsrc/android-template and run the
following command to generate the JNI interface using SWIG:
./gradlew opensmile:swig
Then, build the aar library using Gradle
./gradlew opensmile:assemble -P{YOUR PARAMETERS}
and integrate the aar into your app by moving it to
src/main/libs of your app and adding
repositories {
    flatDir {
        dirs "src/main/libs"
    }
}

dependencies {
    ...
    Implementation group: 'com.audeering.opensmile', name: 'opensmile-debug', ext: 'aar'
}
into the build.gradle.
Alternatively, you may build the sample app directly using Gradle:
./gradlew app:assembleUseSource -P{YOUR PARAMETERS}
Regarding the parameters, please refer to build_flags.sh and
gradle.properties.
Compiling for iOS and creating an iOS App
This section outlines the steps required to build openSMILE for iOS and call SMILEapi functions from within Objective-C or Swift. The minimum supported iOS version is 11.0.
Build openSMILE static library
Run the following command in the openSMILE directory to build a openSMILE as a universal library for iOS:
bash buildIosUniversalLib.sh
If successful, the openSMILE libraries should have been created
under ./build_ios/ALL.
Integrate openSMILE library into an Xcode project
Apply the following settings in your Xcode project.
Under Build Settings -> Header Search Paths, add the following header paths:
../../src/include
../../progsrc/include/
../../build_ios/ALL/include
Under Build Settings -> Library Search Paths, add the following library paths:
../../build_ios/ALL
Under Build Settings -> Preprocessor Macros, set the following defines:
__IOS__
Under Build Phases -> Link Binary With Libraries, add the following libraries:
./build_ios/ALL/libopensmile.a
Using SMILEapi and openSMILE classes in Objective-C
Create a new Objective-C file in Xcode and change its extension from “.m” to “.mm”.
#import the SMILEapi header and any other headers you need:
#import <smileapi/SMILEapi.h>
#import <core/configManager.hpp>
#import <core/componentManager.hpp>
#import <ios/coreAudioSource.hpp>
...
You may now call SMILEapi functions in your code. The iOS sample
project under progsrc/ios-template can serve as a
reference, see also files
progsrc/ios-template/usingSmileLib/SmileIos/OpenSmile.h and
progsrc/ios-template/usingSmileLib/SmileIos/OpenSmile.mm.
Using SMILEapi and openSMILE classes in Swift
The SMILEapi functions are pure C functions. There are two options for using these APIs in Swift.
You can call them directly from within Swift.
You can write an Objective-C wrapper class and integrate it into a Swift project. The iOS template project uses this approach.
Extracting your first features
Now, that you have either successfully downloaded and installed the binary version of openSMILE or have compiled the source code yourself, you are ready to extract your first features. To check if you can run SMILExtract, type:
SMILExtract -h
If you see the usage information and version number of openSMILE, then everything is set up correctly. To check if your SMILExtract binary supports live audio recording and playback, type:
SMILExtract -H cPortaudio
If you see various configuration option of the cPortaudio components, then your binary supports live audio I/O. If you see only three lines with messages, then you do not have live audio support. To check if your SMILExtract binary supports video features via OpenCV, type:
SMILExtract -H cOpenCV
If you see various configuration option of the cPortaudio components, then your binary supports live audio I/O.
Note
You may have to prefix a “./” on Unix like systems if SMILExtract is not in your path but in the current directory instead.
Now we will start using SMILExtract to extract very simple audio
features from a wave file. You can use your own wave files if you like,
or use the files provided in the example-audio directory.
For a quick start, we will use a sample configuration file provided with the openSMILE distribution. Type the following command in the top-level directory of the openSMILE package (if you start openSMILE in a different directory you must adjust the paths to the config file and the wave file):
SMILExtract -C config/demo/demo1_energy.conf -I example-audio/opensmile.wav -O opensmile.energy.csv
If you get only (MSG) type messages, and you see
Processing finished! in the last output line, then openSMILE ran
successfully. If something fails, you will get an (ERROR) message.
Now, if openSMILE ran successfully, open the file
opensmile.energy.csv in a text editor to see the result. You can also
plot the result graphically using gnuplot. This is discussed in
Section Visualising data with Gnuplot.
Next, we will generate the configuration file from the above simple
example ourselves to learn how openSMILE configuration files are
written. openSMILE can generate configuration file templates for simple
scenarios. We will use this function to generate our first configuration
file which will be capable of reading a wave file, computing frame
energy, and saving the output to a CSV file. First, create a directory
myconfig (without navigating into it) which will hold your
configuration files. Now type the following (without newlines) to
generate the first configuration file:
SMILExtract -cfgFileTemplate -configDflt cWaveSource,cFramer,cEnergy,cCsvSink -l 1 2> myconfig/demo1.conf
The -cfgFileTemplate option instructs openSMILE to generate a
configuration file template, while the -configDflt option is used to
specify a comma separated list of components which shall be part of the
generated configuration. The -l 1 option sets the log-level to one,
to suppress any messages, which should not be in the configuration file
(you will still get ERROR messages on log-level one, e.g. messages
informing you that components you have specified do not exist, etc.).
The template text would be printed to the terminal, thus we use 2> to
dump it to the file myconfig/demo1.conf. If you want to add comments
describing the individual option lines in the generated configuration
file, add the option -cfgFileDescriptions to the above command-line:
SMILExtract -cfgFileTemplate -cfgFileDescriptions -configDflt cWaveSource,cFramer,cEnergy,cCsvSink -l 1 2> myconfig/demo1_descriptions.conf
The newly generated file consists of two logical parts. The first part
looks like this (please note, that comments in the examples are started
by ; or // and may only start at the beginning of a line):
 ;= component manager configuration (= list of enabled components!) =

[componentInstances:cComponentManager]
 // this line configures the default data memory:
instance[dataMemory].type = cDataMemory
instance[waveSource].type = cWaveSource
instance[framer].type = cFramer
instance[energy].type = cEnergy
instance[csvSink].type = cCsvSink
// Here you can control the amount of detail displayed for the
// data memory level configuration. 0 is no information at all,
// 5 is maximum detail.
printLevelStats = 1
// You can set the number of parallel threads (experimental):
nThreads = 1
It contains the configuration of the component manager, which determines
what components are instantiated when you call SMILExtract. There always
has to be one cDataMemory component (which handles the data flow within
openSMILE), followed by other components. The name given in []
specifies the name of the component instance, which must be unique within
one configuration.
The next part contains the component configuration sections, where each begins with a section header:
[waveSource:cWaveSource]
...
[framer:cFramer]
...
[energy:cEnergy]
...
[csvSink:cCsvSink]
...
The section header follows this format:
[instanceName:componentType]. The template component configuration
sections are generated with all available values set to their default
values. This functionality currently is still experimental, because some
values might override other values, or have a different meaning if
explicitly specified. Thus, you should carefully check all the available
options, and list only those in the configuration file which you
require. Even if in some cases you might use the default values (such as
the number of spectral bands, etc.) it is considered good practice to
include these in the configuration file. This will ensure compatibility
with future versions, in case the defaults - for whatever reason - might
change. Moreover, it will increase the readability of your configuration
files because all parameters can be viewed in one place without looking
up the defaults in this manual.
Next, you have to configure the component connections. This can be done
by assigning so called data memory “levels” to the dataReader and
dataWriter components which are always contained in each source, sink,
or processing component by modifying the reader.dmLevel and
writer.dmLevel lines. You can choose arbitrary names for the writer
levels here, since the dataWriters register and create the level you
specify as writer.dmLevel in the data memory. You then connect the
components by assigning the desired read level to reader.dmLevel.
Thereby the following rules apply: for one level only one writer may
exist, i.e. only one component can write to a level; however, there is
no limit to the number of components that read from a level, and one
component can read from more than one level if you specify multiple
level names separated by a ;, such as
reader.dmLevel = energy;loudness to read data from the levels
energy and loudness. Data is thereby concatenated column wise.
For our sample configuration, the cWaveSource component should read the input PCM stream in wave form into memory. The cFramer component should then create frames of 25ms length every 10ms from that representation. To do so, we change the following lines:
[waveSource:cWaveSource]
writer.dmLevel = <<XXXX>>
to
[waveSource:cWaveSource]
writer.dmLevel = wave
and the framer section
[framer:cFramer]
reader.dmLevel = <<XXXX>>
writer.dmLevel = <<XXXX>>
...
to (note, that we removed a few superfluous frameSize* options and changed frameStep to 0.010000):
[framer:cFramer]
reader.dmLevel = wave
writer.dmLevel = waveframes
copyInputName = 1
frameMode = fixed
frameSize = 0.025000
frameStep = 0.010000
frameCenterSpecial = left
noPostEOIprocessing = 1
Next, we generate the cEnergy component, which will read the audio frames created by the cFramer component, and compute the signal log energy. The cCsvSink component will then write the results from the cEnergy component to a file in CSV format. Thus, we change the corresponding lines to:
[energy:cEnergy]
reader.dmLevel = waveframes
writer.dmLevel = energy
...
rms = 0
log = 1
...
[csvSink:cCsvSink]
reader.dmLevel = energy
filename = myenergy.csv
...
We are now ready to run SMILExtract with our own configuration file:
SMILExtract -C myconfig/demo1.conf
This will open the file “input.wav” in the current directory (be sure to copy a suitable wave file and rename it to “input.wav”), do the feature extraction, and save the result to “myenergy.csv”. The result should be the same as with the sample configuration file.
If you want to be able to pass the input file name and the output file name on the SMILExtract command-line, you have to add a command to the configuration file to define a custom command-line option. To do this, change the filename lines of the wave source and the csv sink to:
[waveSource:cWaveSource]
...
filename = \cm[inputfile(I):file name of the input wave file]
...
[csvSink:cCsvSink]
...
filename = \cm[outputfile(O):file name of the output CSV file]
...
You can now run:
SMILExtract -C myconfig/demo1.conf -I example-audio/opensmile.wav -O opensmile.energy.csv
This concludes the introductory section. We hope that you now understand the basics of how to use and configure openSMILE, and are ready to take a look at the more complex examples which are explained in Section Default feature sets. Among these are also standard baseline feature sets of international research competitions. The section also explains several command-line options that the standard feature set configuration files provide and that can be used to influence parameters of the data input and output.
Default feature sets
For common tasks from the Music Information Retrieval and Speech
Processing fields we provide some sample configuration files in the
config/ directory for the following frequently used feature sets.
These also contain the baseline acoustic feature sets of the 2009–2013
INTERSPEECH challenges on affect and paralinguistics:
Chroma features for key and chord recognition
MFCC for speech recognition
PLP for speech recognition
Prosody (Pitch and loudness)
The INTERSPEECH 2009 Emotion Challenge feature set
The INTERSPEECH 2010 Paralinguistic Challenge feature set
The INTERSPEECH 2011 Speaker State Challenge feature set
The INTERSPEECH 2012 Speaker Trait Challenge feature set
The INTERSPEECH 2013 ComParE feature set
The MediaEval 2012 TUM feature set for violent scenes detection.
Three reference sets of features for emotion recognition (older sets, obsoleted by the new INTERSPEECH challenge sets)
Audio-visual features based on INTERSPEECH 2010 Paralinguistic Challenge audio features.
These configuration files can be used as they are, or as a basis for your own feature files.
Note
If you publish results with features extracted by openSMILE, we would appreciate it if you share your configuration files with the research community, by uploading them to your personal web-pages and providing the URL in the paper, for example. Please also indicate which official version of openSMILE you have used to allow others to reproduce your results.
Common options for all standard configuration files
Since version 2.2, most standard feature extraction configuration files
include a standard interface for specifying command-line options for
audio input and for feature output in various formats (WEKA Arff, HTK
binary, CSV text). Common configuration file includes are used for this
purpose and can be found in the folder config/shared.
The options are defined in the configuration files themselves, see Section Configuration files for details on this mechanism and the syntax. In order to view the available options for a configuration file, use the following command:
SMILExtract -C config/putconfigfilenamehere.conf -ccmdHelp
The following options are available for audio input for all standard configuration files:
-inputfile, -I  <filename>       Path and name of input audio file.

-start          <t in seconds>   Where to start analysis, relative
                                   to the beginning of the file (0).

-end            <t in seconds>   Where to end analysis, relative
                                   to beginning of file (0).
                                   Default (-1) is end of file.
These options are defined in
config/shared/standard_wave_input.conf.inc.
The following options are available for controlling the buffer and segmentation behaviour:
-frameModeFunctionalsConf <file>   Include, which configures the frame
                                     mode setting for all functionals
                                     components.
   Default: shared/FrameModeFunctionals.conf.inc

-bufferModeRbConf shared/BufferModeRb.conf.inc
-bufferModeRbLagConf shared/BufferModeRbLag.conf.inc
-bufferModeConf shared/BufferMode.conf.inc
frameModeFunctionalsConf is the most important option. It controls
the time units on which the functionals components operate. The
following examples (contents of the included file) illustrate the four
most common use-cases.
Summary over complete input:
frameMode = full
frameSize = 0
frameStep = 0
frameCenterSpecial = left
B. Multiple summaries over fixed size (sliding) windows (5 seconds long, shifted forward at intervals of 2 seconds):
frameMode = fixed
frameSize = 5
frameStep = 2
frameCenterSpecial = left
C. Summaries over a given list of segments (4.2 seconds to 5.6 seconds, 7.0 to 9.0 seconds, 10 seconds to end of file):
frameMode = list
frameList = 4.2s-5.6s,7.0s-9s,10s-E
frameCenterSpecial = left
D. Summaries over variable segments, which are detected on-the-fly by a cTurnDetector component, and received via smile messages:
frameMode = var
frameCenterSpecial = left
A cTurnDetector component must be present in the configuration with the
messageRecp option pointing to all functionals components in the
configuration. See the online help of cTurnDetector for details, or
config/emobase/emobase_live4.conf for a simple example.
The bufferMode configuration files set the size of the dataMemory
level output buffers for general components which process frame-by-frame
(bufferModeRbConf), for components which operate with lagged data
(e.g., F0 after Viterbi smoothing) (bufferModeRbLagConf), and for
components which produce output that is to be summarised over time by
other components (e.g., functionals, or classifiers that use context)
(bufferModeConf). The buffer size configured by the latter must
match the frameMode setting in frameModeFunctionalsConf, i.e., the
buffer specified in bufferModeConf must be at least the size of the
requested unit of segmentation (frameMode). In case the complete input
is to be summarised (frameMode=full), the output buffer must be
configured to grow dynamically (growDyn=1) and not act as as
ring/cyclical buffer (isRb=0), e.g.:
writer.levelconf.growDyn = 1
writer.levelconf.isRb = 0
writer.levelconf.nT = 100
The value of nT is not relevant, it just sets the initial size of
the buffer (in number of LLD frames). This configuration is not suitable
for live mode, as it will occupy infinite amounts of RAM over time and
will make the openSMILE process crash at some point in time.
Thus, for live demos, the buffer size must be constrained and the maximum size of segments to summarise features over must also be constrained. In variable mode (when receiving messages from cTurnDetector), this is achieved by the maximum turn length settings in cTurnDetector. Otherwise, the frameSize setting e.g. should be less then the buffer size (nT). An example for a ring-buffer configuration for live mode would be:
writer.levelconf.growDyn = 0
writer.levelconf.isRb = 1
writer.levelconf.nT = 1000
This corresponds to a buffer size of 10 seconds, if the frame rate of LLD features is 10ms, which is the default in almost all configurations.
The following options are available for controlling the output data formats (for configurations which provide feature summaries via statistical functionals, such as all INTERSPEECH and AVEC challenge sets):
=============================
-instname         <string>      Usually the input filename, saved in
                                  first column in CSV and ARFF output.
                                  Default is "unknown".

=============================
-lldcsvoutput, -D <filename>    Enables LLD frame-wise output to CSV.

-appendcsvlld     <0/1>         Set to 1 to append to existing CSV
                                  output file. Default is overwrite (0).

-timestampcsvlld  <0/1>         Set to 0 to disable timestamp output
                                  to CSV in second column. Default is 1.

-headercsvlld     <0/1>         Set to 0 to disable header output (1st
                                  line) to CSV. Default is 1 (enabled)

=============================
-lldhtkoutput     <filename>    Enables LLD frame-wise output to
                                  HTK format.

=============================
-lldarffoutput, -D <filename>   Enables LLD frame-wise output to ARFF.

-appendarfflld     <0/1>        Set to 1 to append to existing ARFF
                                  output file. Default is overwrite (0).

-timestamparfflld  <0/1>        Set to 0 to disable timestamp output
                                  to ARFF in second column. Default 1.

-lldarfftargetsfile <file>      Specify the configuration include, that
                                  defines the target fields (classes)
                                  Default: shared/arff_targets_conf.inc

=============================
-output, -O       <filename>    The default output option. To ARFF
                                  file format, for feature summaries.

-appendarff       <0/1>         Set to 0 to not append to existing ARFF
                                  output file. Default is append (1).

-timestamparff    <0/1>         Set to 1 to enable timestamp output
                                  to ARFF in second column. Default 0.

-arfftargetsfile <file>         Specify the configuration include, that
                                  defines the target fields (classes)
                                  Default: shared/arff_targets_conf.inc

=============================
-csvoutput        <filename>    The default output option. To CSV
                                  file format, for feature summaries.

-appendcsv        <0/1>         Set to 0 to not append to existing CSV
                                  output file. Default is append (1).

-timestampcsv     <0/1>         Set to 0 to disable timestamp output
                                  to CSV in second column. Default 1.

-headercsv        <0/1>         Set to 0 to disable header output (1st
                                  line) to CSV. Default is 1 (enabled)

=============================
-htkoutput       <filename>     Enables output to HTK format of
                                  feature summaries (functionals).
These options are defined in
config/shared/standard_data_output.conf.inc.
For configurations which provide Low-Level-Descriptor (LLD) features only (i.e. which do not summarise features by means of statistical functionals over time), the following output options are available:
=============================
-csvoutput        <filename>    The default output option. To CSV
                                  file format, for frame-wise LLD.

-appendcsv        <0/1>         Set to 1 to append to existing CSV
                                  output file. Default is overwrite (0).

-timestampcsv     <0/1>         Set to 0 to disable timestamp output
                                  to CSV in second column. Default 1.

-headercsv        <0/1>         Set to 0 to disable header output (1st
                                  line) to CSV. Default is 1 (enabled)

=============================
-output, -O       <filename>    Default output to HTK format of
                                  feature summaries (functionals).

=============================
-arffoutput       <filename>    The default output option. To ARFF
                                  file format, for frame-wise LLD.

-appendarff       <0/1>         Set to 0 to not append to existing ARFF
                                  output file. Default is append (1).

-timestamparff    <0/1>         Set to 0 to disable timestamp output
                                  to ARFF in second column. Default 1.

-arfftargetsfile <file>         Specify the configuration include, that
                                  defines the target fields (classes)
                                  Default: shared/arff_targets_conf.inc
These options are defined in
config/shared/standard_data_output_lldonly.conf.inc.
Note
Since version 2.2 you can specify a ’?’ instead of a filename.
This will disable the corresponding output component, i.e., it will
not write an output file. In the standard data output interface all
filenames default to ’?’, except for the standard output options (-O)
which default to output.htk or output.arff.
All configuration files which support the standard data output format
can be used in the Windows batch feature extraction GUI (Visual Studio
project in progsrc/openSMILEbatchGUI/). This tool allows to run
openSMILE on several files in a folder automatically. It allows to
select audio files and specify the file output type via a graphical
interface.
Chroma features
The configuration file config/chroma/chroma_fft.conf computes musical
Chroma features (for 12 semi-tones) from a short-time FFT spectrogram
(window-size 50ms, rate 10ms, Gauss-window). The spectrogram is scaled
to a semi-tone frequency axis scaling using triangular filters. To use
this configuration, type:
SMILExtract -C config/chroma/chroma_fft.conf -I input.wav -O chroma.csv
The resulting CSV file contains the Chroma features as ascii float
values separated by ‘;’, one frame per line. This configuration uses the
‘cTonespec’ component to compute the semitone spectrum. We also provide
a configuration using the experimental ‘cTonefilt’ as a replacement for
‘cTonespec’ in the file config/chroma/chroma_filt.conf.
We also provide a sample configuration for computing a single vector
which contains the mean value of the Chroma features computed over the
complete input sequence. Such a vector can be used for recognising the
musical key of a song. The configuration is provided in
config/chroma/chroma_fft.sum.conf. It uses the ‘cFunctionals’ component to
compute the mean values of the Chroma contours. Use it with the
following command-line:
SMILExtract -C config/chroma/chroma_fft.sum.conf -I input.wav -O chroma.csv
chroma.csv will contain a single line with 12 values separated by
‘;’, representing the mean Chroma values.
MFCC features
For extracting MFCC features (HTK compatible) the following four files are provided (they are named after the corresponding HTK parameter kinds they represent):
- MFCC12_0_D_A.conf
This configuration extracts Mel-frequency Cepstral Coefficients from 25ms audio frames (sampled at a rate of 10ms) (Hamming window). It computes 13 MFCC (0-12) from 26 Mel-frequency bands, and applies a cepstral liftering filter with a weight parameter of 22. 13 delta and 13 acceleration coefficients are appended to the MFCC.
- MFCC12_E_D_A.conf
This configuration is the same as MFCC12_0_D_A.conf, except that the log-energy is appended to the MFCC 1-12 instead of the 0-th MFCC.
- MFCC12_0_D_A_Z.conf
This configuration is the same as MFCC12_0_D_A.conf, except that the features are mean normalised with respect to the full input sequence (usually a turn or sub-turn segment).
- MFCC12_E_D_A_Z.conf
This configuration is the same as MFCC12_E_D_A.conf, except that the features are mean normalised with respect to the full input sequence (usually a turn or sub-turn segment).
The frame size is set to 25ms at a rate of 10ms. A Hamming function is
used to window the frames and a pre-emphasis with \(k=0.97\) is
applied. The MFCC 0/1-12 are computed from 26 Mel-bands computed from
the FFT power spectrum. The frequency range of the Mel-spectrum is set
from 0 to 8kHz. These configuration files provide the -I and -O
options. The output file format is the HTK parameter file format. For
other file formats you must change the ‘cHtkSink’ component type in the
configuration file to the type you want. A sample command-line is given
here:
SMILExtract -C config/mfcc/MFCC12_E_D_A.conf -I input.wav -O output.mfcc.htk
PLP features
For extracting PLP cepstral coefficients (PLP-CC) (HTK compatible) the following four files are provided (they are named after the corresponding HTK parameter kinds they represent):
- PLP_0_D_A.conf
This configuration extracts Mel-frequency Cepstral Coefficients from 25ms audio frames (sampled at a rate of 10ms) (Hamming window). It computes 6 PLP (0-5) from 26 Mel-frequency bands using a predictor order of 5, and applies a cepstral liftering filter with a weight parameter of 22. 6 delta and 6 acceleration coefficients are appended to the PLP-CC.
- PLP_E_D_A.conf
This configuration is the same as PLP_0_D_A.conf, except that the log-energy is appended to the PLP 1-5 instead of the 0-th PLP.
- PLP_0_D_A_Z.conf
This configuration is the same as PLP_0_D_A.conf, except that the features are mean normalised with respect to the full input sequence (usually a turn or sub-turn segment).
- PLP_E_D_A_Z.conf
This configuration is the same as PLP_E_D_A.conf, except that the features are mean normalised with respect to the full input sequence (usually a turn or sub-turn segment).
The frame size is set to 25ms at a rate of 10ms. A Hamming function is
used to window the frames and a pre-emphasis with \(k=0.97\) is
applied. The PLP 0/1-5 are computed from 26 auditory Mel-bands
(compression factor 0.33) computed from the FFT power spectrum. The
predictor order of the linear predictor is 5. The frequency range of the
Mel-spectrum is set from 0 to 8kHz. These configuration files provide
the -I and -O options. The output file format is the HTK
parameter file format. For other file formats you must change the
‘cHtkSink’ component type in the configuration file to the type you
want. A sample command-line is given here:
SMILExtract -C config/plp/PLP_E_D_A.conf -I input.wav -O output.plp.htk
Prosodic features
Example configuration files for extracting prosodic features are provided in the files
config/prosody/prosodyAcf.conf, andconfig/prosody/prosodyShs.conf.
These files extract the fundamental frequency (F0), the voicing
probability, and the loudness contours. The file prosodyAcf.conf
uses the ‘cPitchACF’ component to extract the fundamental frequency via
an autocorrelation and cepstrum based method. The file
prosodyShs.conf uses the ‘cPitchShs’ component to extract the
fundamental frequency via the sub-harmonic sampling algorithm (SHS).
Both configurations set the CSV format as output format. A sample
command-line is given here:
SMILExtract -C config/prosody/prosodyShs.conf -I input.wav -O prosody.csv
Extracting features for emotion recognition
Since openSMILE is used by the openEAR project [EWollmerS09] for emotion recognition, various standard feature sets for emotion recognition are available as openSMILE configuration files.
The INTERSPEECH 2009 Emotion Challenge feature set
The INTERSPEECH 2009 Emotion Challenge feature set
(see [SSB09]) is defined in
config/is09-13/IS09_emotion.conf. It contains 384 features as statistical
functionals applied to low-level descriptor contours. The features are
saved in Arff format (for WEKA), whereby new instances are appended to
an existing file (this is used for batch processing, where openSMILE is
repeatedly called to extract features from multiple files to a single
feature file). The names of the 16 low-level descriptors, as they appear
in the Arff file, are documented in the following list:
- pcm_RMSenergy
Root-mean-square signal frame energy
- mfcc
Mel-Frequency cepstral coefficients 1-12
- pcm_zcr
Zero-crossing rate of time signal (frame-based)
- voiceProb
The voicing probability computed from the ACF.
- F0
The fundamental frequency computed from the Cepstrum.
The suffix _sma appended to the names of the low-level descriptors indicates that they were smoothed by a moving average filter with window length 3. The suffix _de appended to _sma suffix indicates that the current feature is a 1st order delta coefficient (differential) of the smoothed low-level descriptor. The names of the 12 functionals, as they appear in the Arff file, are documented in the following list:
- max
The maximum value of the contour
- min
The minimum value of the contour
- range
= max-min
- maxPos
The absolute position of the maximum value (in frames)
- minPos
The absolute position of the minimum value (in frames)
- amean
The arithmetic mean of the contour
- linregc1
The slope (m) of a linear approximation of the contour
- linregc2
The offset (t) of a linear approximation of the contour
- linregerrQ
The quadratic error computed as the difference of the linear approximation and the actual contour
- stddev
The standard deviation of the values in the contour
- skewness
The skewness (3rd order moment).
- kurtosis
The kurtosis (4th order moment).
The INTERSPEECH 2010 Paralinguistic Challenge feature set
The INTERSPEECH 2010 Paralinguistic Challenge feature set (see
Proceedings of INTERSPEECH 2010) is represented by the configuration
file config/is09-13/IS10_paraling.conf. The set contains 1582 features which
result from a base of 34 low-level descriptors (LLD) with 34
corresponding delta coefficients appended, and 21 functionals applied to
each of these 68 LLD contours (1428 features). In addition, 19
functionals are applied to the 4 pitch-based LLD and their four delta
coefficient contours (152 features). Finally the number of pitch onsets
(pseudo syllables) and the total duration of the input are appended (2
features).
The features are saved in Arff format (for WEKA), whereby new instances are appended to an existing file (this is used for batch processing, where openSMILE is repeatedly called to extract features from multiple files to a single feature file). The names of the 34 low-level descriptors, as they appear in the Arff file, are documented in the following list:
- pcm_loudness
The loudness as the normalised intensity raised to a power of 0.3.
- mfcc
Mel-Frequency cepstral coefficients 0-14
- logMelFreqBand
logarithmic power of Mel-frequency bands 0 - 7 (distributed over a range from 0 to 8kHz)
- lspFreq
The 8 line spectral pair frequencies computed from 8 LPC coefficients.
- F0finEnv
The envelope of the smoothed fundamental frequency contour.
- voicingFinalUnclipped
The voicing probability of the final fundamental frequency candidate. Unclipped means, that it was not set to zero when is falls below the voicing threshold.
The suffix _sma appended to the names of the low-level descriptors indicates that they were smoothed by a moving average filter with window length 3. The suffix _de appended to _sma suffix indicates that the current feature is a 1st order delta coefficient (differential) of the smoothed low-level descriptor. The names of the 21 functionals, as they appear in the Arff file, are documented in the following list:
- maxPos
The absolute position of the maximum value (in frames)
- minPos
The absolute position of the minimum value (in frames)
- amean
The arithmetic mean of the contour
- linregc1
The slope (m) of a linear approximation of the contour
- linregc2
The offset (t) of a linear approximation of the contour
- linregerrA
The linear error computed as the difference of the linear approximation and the actual contour
- linregerrQ
The quadratic error computed as the difference of the linear approximation and the actual contour
- stddev
The standard deviation of the values in the contour
- skewness
The skewness (3rd order moment).
- kurtosis
The kurtosis (4th order moment).
- quartile1
The first quartile (25% percentile)
- quartile2
The first quartile (50% percentile)
- quartile3
The first quartile (75% percentile)
- iqr1-2
The inter-quartile range: quartile2-quartile1
- iqr2-3
The inter-quartile range: quartile3-quartile2
- iqr1-3
The inter-quartile range: quartile3-quartile1
- percentile1.0
The outlier-robust minimum value of the contour, represented by the 1% percentile.
- percentile99.0
The outlier-robust maximum value of the contour, represented by the 99% percentile.
- pctlrange0-1
The outlier robust signal range ‘max-min’ represented by the range of the 1% and the 99% percentile.
- upleveltime75
The percentage of time the signal is above (75% * range + min).
- upleveltime90
The percentage of time the signal is above (90% * range + min).
The four pitch related LLD (and corresponding delta coefficients) are as follows (all are 0 for unvoiced regions, thus functionals are only applied to voiced regions of these contours):
- F0final
The smoothed fundamental frequency contour
- jitterLocal
The local (frame-to-frame) Jitter (pitch period length deviations)
- jitterDDP
The differential frame-to-frame Jitter (the ‘Jitter of the Jitter’)
- shimmerLocal
The local (frame-to-frame) Shimmer (amplitude deviations between pitch periods)
19 functionals are applied to these 4+4 LLD, i.e. the set of 21 functionals mentioned above without the minimum value (the 1% percentile) and the range.
The INTERSPEECH 2011 Speaker State Challenge feature set
The configuration file for this set can be found in
config/is09-13/IS11_speaker_state.conf.
Details on the feature set will be added to the openSMILE book soon. Meanwhile, we refer to the Challenge paper:
Björn Schuller, Anton Batliner, Stefan Steidl, Florian Schiel, Jarek Krajewski: “The INTERSPEECH 2011 Speaker State Challenge”, Proc. INTERSPEECH 2011, ISCA, Florence, Italy, pp. 3201-3204, 28.-31.08.2011.
The INTERSPEECH 2012 Speaker Trait Challenge feature set
The configuration file for this set can be found in
config/is09-13/IS12_speaker_trait.conf.
Details on the feature set will be added to the openSMILE book soon. Meanwhile, we refer to the Challenge paper:
Björn Schuller, Stefan Steidl, Anton Batliner, Elmar Nöth, Alessandro Vinciarelli, Felix Burkhardt, Rob van Son, Felix Weninger, Florian Eyben, Tobias Bocklet, Gelareh Mohammadi, Benjamin Weiss: “The INTERSPEECH 2012 Speaker Trait Challenge”, Proc. INTERSPEECH 2012, ISCA, Portland, OR, USA, 09.-13.09.2012.
The INTERSPEECH 2013 ComParE Challenge feature set
The configuration file for this set can be found in
config/is09-13/IS13_ComParE.conf. A configuration for the vocaliations
(laughter, etc.) sub-challenge can be found in the file
config/is09-13/IS13_ComParE_Voc.conf.
Details on the feature set will be added to the openSMILE book soon. Meanwhile, we refer to the Challenge paper:
Björn Schuller, Stefan Steidl, Anton Batliner, Alessandro Vinciarelli, Klaus Scherer, Fabien Ringeval, Mohamed Chetouani, Felix Weninger, Florian Eyben, Erik Marchi, Marcello Mortillaro, Hugues Salamin, Anna Polychroniou, Fabio Valente, Samuel Kim: “The INTERSPEECH 2013 Computational Paralinguistics Challenge: Social Signals, Conflict, Emotion, Autism”, to appear in Proc. INTERSPEECH 2013, ISCA, Lyon, France, 2013.
The MediaEval 2012 TUM feature set for violent video scenes detection
The feature set for the work on violent scenes detection in popular Hollywood style movies as presented in:
Florian Eyben, Felix Weninger, Nicolas Lehment, Gerhard Rigoll, Björn Schuller: “Violent Scenes Detection with Large, Brute-forced Acoustic and Visual Feature Sets”, Proc. MediaEval 2012 Workshop, Pisa, Italy, 04.-05.10.2012.
can be found for various settings in
config/mediaeval12.
The file MediaEval_Audio_IS12based_subwin2.conf contains the
configuration which extracts the static audio features from 2 second
sub-windows.
MediaEval_Audio_IS12based_subwin2_step0.5.conf extracts the same
features, but for overlapping 2 second windows with a shift of 0.5
seconds. For the video features the file
MediaEval_VideoFunctionals.conf is provided, which requires a CSV
file containing the low-level descriptors (can be extracted with OpenCV)
as input and outputs and ARFF file with the video features as used in
the paper.
The openSMILE/openEAR ‘emobase’ set
The old baseline set (see the ‘emobase2’ set for the new baseline set) of 988 acoustic features for emotion recognition can be extracted using the following command:
SMILExtract -C config/emobase/emobase.conf -I input.wav -O output.arff
This will produce an ARFF file with a header containing all the feature names and one instance, containing a feature vector for the given input file. To append more instances to the same ARFF file, simply run the above command again for different (or the same) input files. The ARFF file will have a dummy class label called emotion, containing one class unknown by default. To change this behaviour and assign custom classes and class labels to an individual instance, use a command-line like the following:
SMILExtract -C config/emobase/emobase.conf -I inputN.wav -O output.arff -instname inputN -classes {anger,fear,disgust} -classlabel anger
Thereby the parameter -classes specifies the list of nominal classes
including the {} characters, or can be set to numeric for a numeric
(regression) class. The parameter -classlabel specifies the class
label/value of the instance computed from the currently given input
(-I). For further information on these parameters, please take a look at
the configuration file emobase.conf where these command-line
parameters are defined.
The feature set specified by emobase.conf contains the following
low-level descriptors (LLD): Intensity, Loudness, 12 MFCC, Pitch
(\(F_0\)), Probability of voicing, \(F_0\) envelope, 8 LSF (Line
Spectral Frequencies), Zero-Crossing Rate. Delta regression coefficients
are computed from these LLD, and the following functionals are applied
to the LLD and the delta coefficients: Max./Min. value and respective
relative position within input, range, arithmetic mean, 2 linear
regression coefficients and linear and quadratic error, standard
deviation, skewness, kurtosis, quartile 1–3, and 3 inter-quartile
ranges.
The large openSMILE emotion feature set
For extracting a larger feature set with more functionals and more LLD enabled (6552 features in total), use the configuration file
config/misc/emo_large.conf
Please read the configuration file and the header of the generated arff file in conjunction with the matching parts in the component reference section (Components) for details on the contained feature set. A documentation has to be yet written, volunteers are welcome!
The openSMILE ‘emobase2010’ reference set
This feature set is based on the INTERSPEECH 2010 Paralinguistic Challenge feature set. It is represented by the file
config/emobase/emobase2010.conf
A few tweaks have been made regarding the normalisation of duration and positional features. This feature set contains a greatly enhanced set of low-level descriptors, as well as a carefully selected list of functionals compared to the older ‘emobase’ set. This feature set is recommended as a reference for comparing new emotion recognition feature sets and approaches to, since it represents a current state-of-the-art feature set for affect and paralinguistic recognition.
The set contains 1582 features (same as the INTERSPEECH 2010 Paralinguistic Challenge set) which result from a base of 34 low-level descriptors (LLD) with 34 corresponding delta coefficients appended, and 21 functionals applied to each of these 68 LLD contours (1428 features). In addition, 19 functionals are applied to the 4 pitch-based LLD and their four delta coefficient contours (152 features). Finally the number of pitch onsets (pseudo syllables) and the total duration of the input are appended (2 features). The only difference to the INTERSPEECH 2010 Paralinguistic Challenge set is the normalisation of the ‘maxPos’ and ‘minPos’ features which are normalised to the segment length in the present set.
Audio-visual features based on INTERSPEECH 2010 audio features
The folder config/audiovisual contains two configuration files for video
features (video.conf) and synchronised audio-visual feature extraction
(audiovideo.conf). These files are used for the examples in
Section Extracting features with OpenCV. The audio features and the set
of functionals which is applied to both the audio and the video low-level
features is taken from the INTERSPEECH 2010 Paralinguistic Challenge feature set
(Section The INTERSPEECH 2010 Paralinguistic Challenge feature set for
details).
The video features contain RGB and HSV colour histograms, local binary
patterns (LBP), and an optical flow histogram. They can either be
extracted from the complete image or only the facial region. The latter
is automatically detected via the OpenCV face detector. The face
detection can be controlled in the configuration file
audiovideo.conf in the section
[openCVSource:cOpenCVSource]
with the option extract_face. The number of histogram bins can also
be changed in this section.
Using PortAudio for live recording/playback
The components cPortaudioSource and cPortaudioSink can be used
as replacements for cWaveSource and cWaveSink. They
produce/expect data in the same format as the wave components.
Two sample configuration files are provided which illustrate the basic
use of PortAudio for recording live audio to file
(config/demo/audiorecorder.conf) and for playing live audio from a
file (config/demo/audioplayer.conf).
Using these configurations is very simple. To record audio to a file, type:
SMILExtract -C config/demo/audiorecorder.conf -sampleRate 44100 -channels 2 -O output.wav
To stop the recording, quit the program with Ctrl+C. To play the recorded audio use this command:
SMILExtract -C config/demo/audioplayer.conf -I output.wav
On top of these two simple examples, a live feature extraction example is provided, which captures live audio and extracts prosodic features (pitch and loudness contours) from the input. The features are saved to a CSV file. To use this configuration, type:
SMILExtract -C config/prosody/liveProsodyAcf.conf
The recording has started once you see the message
(MSG) [2] in cComponentManager : starting single thread processing loop
You can now speak a sample sentence or play some music in front of your
microphone. When you are done, press Ctrl+C to terminate openSMILE. A
CSV file called prosody.csv has now been created in the current
directory (use the -O command-line option to change the file name).
You can now plot the loudness and pitch contours using gnuplot, for
example, as is described in the next section.
Extracting features with OpenCV
openSMILE can extract audio and video features simultaneously and
time-synchronised. An example is provided in the configuration file
config/audiovisual/audiovideo.conf.
For this example to work, you need:
a video file in a supported format (rule of thumb: if FFmpeg can open it, OpenCV/openSMILE can too)
the audio track of the video file in a separate file (.wav format)
You can use MPlayer or FFmpeg, for example, to extract the audio track of the video. The analysis with openSMILE can then be started by executing (all on a single line):
./SMILExtract -C config/audiovisual/audiovideo.conf \
  -V VIDEO_FILE -A AUDIO_FILE -N NAME -a AGE \
  -g GENDER -e ETHNICITY -O VIDEO_ARFF -P AUDIO_ARFF
in a shell, whereas the following replacements should be done:
AUDIO_FILE and VIDEO_FILE should be replaced by the path to the respective audio (.wav) and video input files (can contain the audio track, it is ignored by OpenCV)
NAME denotes the title for the arff instance and can be freely chosen from alphanumeric characters and the underscore character.
AGE, GENDER and ETHNICITY represent the ground-truth class labels for this particular pair of audio/video, if you want them to be included in an ARFF file, which you use to train a classifier.
VIDEO_ARFF and AUDIO_ARFF should be replaced by the desired filename for the respective output arffs.
After execution, two new files will have been created: VIDEO_ARFF and AUDIO_ARFF which contain the audio and video descriptors respectively, time synchronised. If those files already exist, the content is appended accordingly.
Visualising data with Gnuplot
In order to visualise feature contours with gnuplot, you must have and gnuplot
4.6 or newer installed. On Linux gnuplot can be either installed via your
distribution’s package manager (On Ubuntu: sudo apt-get install
gnuplot-nox), or compiled from the source (http://www.gnuplot.info). For
Windows, gnuplot binaries are available from the project web page.
A set of example gnuplot scripts is included with openSMILE in the directory
scripts/gnuplot. The set of these scripts is by far not complete, but we
feel this is not necessary. These script serve as templates which you can easily
adjust for you own tasks. They handle the CSV files generated by openSMILE and
plot them with default gnuplot settings.
The following commands give a step-by-step guide on how to plot Chroma features and an auditory spectrum (Note: we assume that you execute these commands in the top-level directory of the openSMILE distribution, otherwise you may need to adjust the paths):
First, you must extract chroma features from some sample music file, e.g.:
SMILExtract -C config/chroma/chroma_fft.conf -I example-audio/opensmile.wav -O chroma.csv
Then you can plot them with
cd scripts/gnuplot
gnuplot plotchroma.plt
This results in a file chroma.png which is included in
Fig. 1.
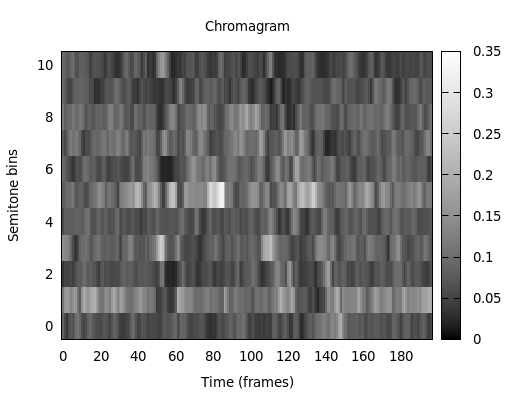
Fig. 1 Chroma features extracted with openSMILE.
For a spectrogram showing the magnitude in decibel, follow these steps:
SMILExtract \
    -C config/spectrum/spectrogram.conf \
    -I example-audio/opensmile.wav \
    -csvoutput spectrogram.csv \
    -dB 1
Then you can plot them with
cd scripts/gnuplot
gnuplot plotspectrogram.plt
This results in a file spectrogram.png which is included in
Fig. 2.

Fig. 2 Spectrogram features extracted with openSMILE.
To plot feature contours such as pitch or energy, first extract some
sample contours using the prosodyAcf.conf configuration, for example
(you can also use the live feature extractor configuration, mentioned in
the previous section):
SMILExtract -C config/prosody/prosodyAcf.conf -I example-audio/opensmile.wav -csvoutput prosody.csv
Next, you can plot the loudness and voice probability contours with
cd scripts/gnuplot
gnuplot plotcontour.plt
This results in a file contour.png which is included in
Fig. 3.
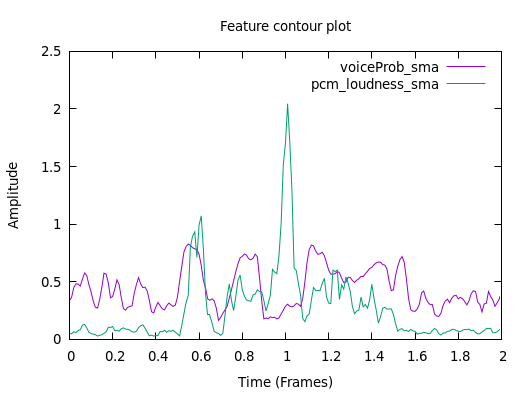
Fig. 3 Pitch contour features extracted with openSMILE.
To plot other features of your CSV output, have a look into the plotting script and change the selected columns to be printed. At the moment the fourth column (pitch contour) is not selected.
Plotting of features in real-time when performing on-line feature extraction is currently not supported. However, since features are extracted incrementally anyways, it is possible to write a custom output plugin, which passes the data to some plotting application in real-time, or plots the data directly using some GUI API.